Laser Paper Update -- What goes into a pattern design??
Posted by Shelley on 8th Jan 2018
Hello Laser Paper People!!
I thought I would do a little blog post for you! Most of my blog posts are regarding Chainmail and Jump Rings which is our main line of work -- But there is always lots of things happening around here!
LASER PAPER UPDATE!
I thought you might be interested to hear what goes into a new idea for a pattern - or what we do with the pattern before we offer them to you!
We are currently working on adding a new size of paper for you! It will be 3"x 9" so perfect for bangle bracelets.
We put a LOT of thought, and testing into our paper designs. I had an idea for paper for an amazing artist that I will be working with this week. She does lots of Bangles, so our 6" paper isn't long enough.
The problem is... paper longer than 9" will not fit in a standard envelope for shipping - and we don't want to have to raise the shipping costs for you. 9" might not be long enough for everyone, and we CAN make them longer, it just becomes expensive to ship them.
I ran this new size past my Jewellery Guru Barrie Edwards. She thought on it and insisted that the paper needed to be wider -- My first thought was 1" x 9 " sheets... but the metal tends to arch or curve when you roll them, so we needed a little leeway. So we increased the size to 3" -- You can still trim this paper down to fit - but leave some extra on the sides in case it curves!
I had a last minute Christmas gift request from a local goldsmith - He doesn't work in Niobium, but we do, and requested some earrings a little longer than we usually make. I went into the studio to whip them up... and ran into failure. Instead of testing my pattern on a small piece of metal, I "eyeballed" it and ran a strip of NIOBIUM (same base metal price as Sterling) (OUCH) that was about 1/2" x 6" I figured would just make a few pairs out of the strip. I cut out my paper, cut a strip of the 140 Pound Watercolour paper to match, and fed it into my new Pepe Mill. Almost instantly I realized I miscalculated, and the mill was TOO TIGHT. I should have immediately backed it up, and loosened my mill, and had a little throw away piece. That would have been the correct action. Did I do that?!?! NO I DID NOT! I FORCED my way into rolling that piece anyways. Which was stupid and wrong. My little voice inside my head was saying "Shelley - This is the new mill... the economy mill needed force like this sometimes... not your new Pepe!!" and "HEY STUPID!!! You need both hands to make this work" So Then I made my SECOND mistake. You should ALWAYS HOLD YOUR Metal sandwich tight with one hand until it completely passes through the mill. This prevents your metal and paper from slipping. So you can see in the picture below, when I let go of my metal sandwich, and cranked with BOTH hands. When the piece of metal came out the end.. I knew before I looked that it wasn't going to be pretty. I ended up THROWING IT ACROSS MY WHOLE Studio.. and started over.
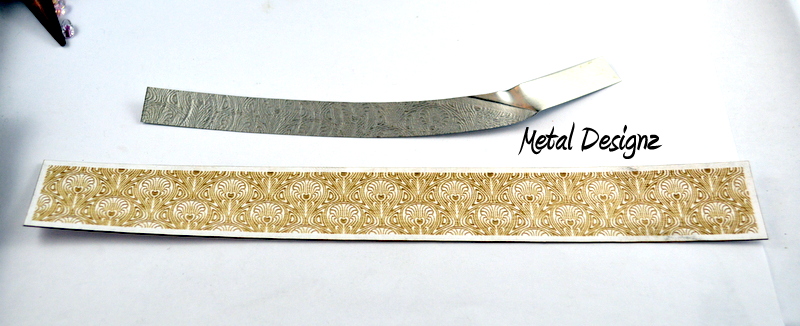
I found it later in the week - And realized I should take a photo - share my shame. It's always good to remind each other that we fail, and we learn something with all those failures too :)
So If you look at the photo above you will see the two mistakes I made. The mill was WAY too tight, so the instead of just seeing that pattern in the metal, you see the half moon creases... it's like the metal was squishing way too hard! Then you can see where the paper slipped, and I wound up with a huge curve, and then NO pattern. This was because I let go, so I could crank with both hands.
I hope that sharing my temper tantrum helps!! And that you know it's ok to screw up as long as you learn from it :)
I will be having a couple of studio days this week... and then the new size of patterns will be added to our Etsy shop!